
Work I Completed
This week in robotics I did the Serial Peripheral Interface (SPI) work. This was a rather quick task, but through it I have gained a basic understanding of how SPI works, and how to use it with an Arduino to communicate with devices with a seperate clock. The issue with serial communication is the non-syncronised clocks within the two systems. Considering the baseline components of a computer revolve around a single clock, it becomes difficult to communicate with other devices when there are slight variations in clock speed. The standard Arduino serial communication solution is asynchronous, but avoids synchronization through having a set transmission speed, and a start and stop bit to sync data as it arrives. These workarounds are also the flaws of asyncronous serial communication - the devices have to have the same baud rate, and have to send two extra bits per byte. SPI is a synchronous solution, and hence does not have as many downsides.
SPI not only sends data, but a clock to the receiving device. Both the sent clock, and data are synchronized so that when the clock sends a pulse, the receiving device can read a bit of the sent data. A visualization of the process is below:
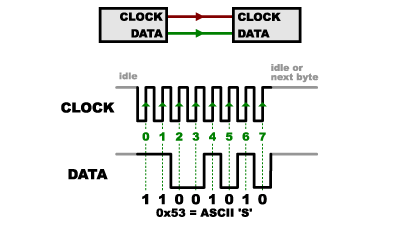
This image represents pulses as green dotted lines, which lines up with the serial data to give a bit. For two-way communication, the peripheral (one-way reviever) has to use another connection to send data synchronized to the controller’s (one-way sender’s) clock, which can be read in the same way. Multiple peripherals can be synchronized with SPI granted there are enough communication lines to the controller.
Although it is possible to implement SPI using pure PWM, the Arduino IDE has an inbuilt library for SPI communication. For SPI to function, all devices must share several properties. If these are not set, Arduino will use default values.
-
The devices can send the most-significant bit, or least-significant bit first, which needs to be configured with setBitOrder()
-
The receiver can read data on the rising edge, or falling edge of a clock pulse, and the clock can be ignored when it is constantly high or low. This is configured with setDataMode().
-
Each device has a different maximum speed for sending and receiving data, yet all devices must operate at the same speed. This speed needs to be configured with setClockDivider() which divides the clock speed by a given value.
-
Arduinos have specific hardware used for SPI connections, meaning specific PWM pins need to be connected to utilize it. On a Arduino, SCK=13, MISO=12, MOSI=11 and SS=10. Alternatively, you can use the TCSP connector pins for the same purpose.
The given SPI example involved SPI communication between an Arduino, and a standard shift register. This is a simple example, which uses 8 LEDs to count from 1 to 256 in binary. As binary counts up from right to left, the bit order is set to least significant bit (LSB) first, meaning the first bit shifted in is LSB, and hence the LSB will be shifted to the right most output.
For the time being, I was not able to get this implementation working in TinkerCad, however I believe I already have a good understanding of SPI and shift registers.
Reflection
Do you think this learning was important?
In most cases when I need to communicate between Arduinos, and to other microcontrollers, it makes most sense to use SPI. You can even communicate with microSD cards using SPI. Currently, none of my project ideas require communication between microcontrollers however I am sure that something will require it in the future. Some potential ideas are using SPI on an Arduino to offload computationally heavy tasks to a Raspberry Pi which would allow complex tasks like AI, and allow the use of superior Arduino peripheral libraries.
Which activities helped you learn the most?
I am seeing a trend with my robotics / mechatronics blog posts where I look at the assigned tasks in much greater detail than required. Instead of just learning how to use a certain feature in Arduinos, I look at the fundamental concepts behind the feature. In this case, instead of understanding how to use the in-built SPI library, I looked at how SPI actually works, and why you would use it over asynchronous serial communication. This is the fun part of learning for me - gaining an advanced understanding of a topic, rather than a baseline one. This is not only fun, but further facilitates my learning of the baseline required stuff, I will likely not forget how to use the Arduino SPI library.